Have you ever scrolled back in your messaging app, desperately searching for that one crucial piece of information from a conversation months ago, only to find it's…gone? Many messaging apps have a feature called auto -delete, which automatically deletes older conversations to save storage space or for privacy reasons. While helpful in some cases, it can be incredibly frustrating when important messages vanish. Don't worry; you can usually control this! Let's dive into how to turn off auto-delete for old conversations so you can keep those precious memories and vital data safe. Understanding Auto-Delete and Why It Matters Before we get into the "how-to," let's take a moment to understand why auto-delete exists and why you might want to disable it. Auto-delete features in messaging apps, likeSignal, Telegram, Whats App, and even some email clients , are designed to automatically remove messages after a specified period. This can rang...
Ever dream of automating your crafting process in Minecraft? Imagine setting up a complex system where items are automatically crafted into the materials you need, freeing you up to explore, build, or battle. The Auto Crafter makes that dream a reality. Let's dive deep into the world of Auto Crafter recipes and explore how to master this game-changing block.
Unlocking the Power of the Auto Crafter: Understanding Recipe Configuration
The Auto Crafter is a revolutionary block that allows players to automate crafting processes. Understanding how to properly configureAuto Crafter recipes is critical to utilizing its full potential. This isn't just about plopping items in and hoping for the best; it's about precision and planning.
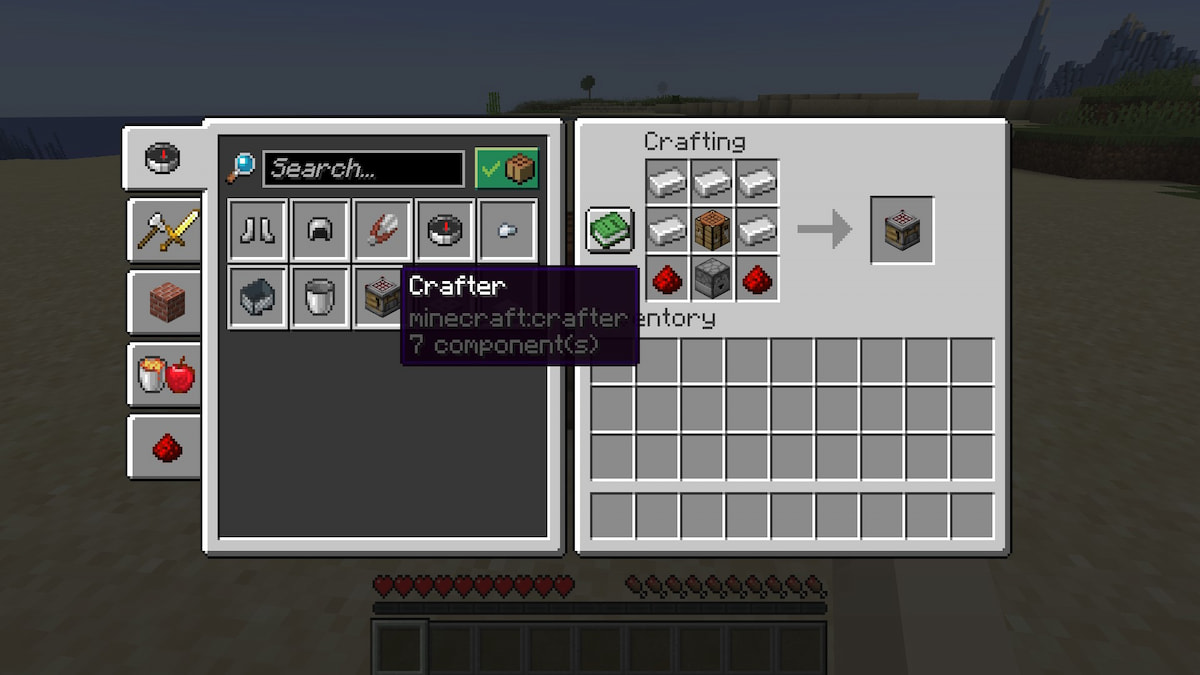
The Auto Crafter Interface
The Auto Crafter interface is where the magic happens. It consists of a 3x3 grid representing the crafting table layout, a result slot where the crafted item appears, and various input and output slots for item management. Let's break down each part:
- Crafting Grid: This is where you define the recipe. You place the required items in the correct positions, just as you would on a regular crafting table.
- Result Slot: This slot displays the item that will be crafted based on the configured recipe. It also indicates if the recipe is valid or not.
- Input Slots: These are the slots where the Auto Crafter draws the necessary ingredients from. You'll need to connect these to item storage systems.
- Output Slots: This is where the crafted items are deposited. Connect these slots to your item transportation system to move the crafted items to your desired location.
Defining the Recipe
Defining an Auto Crafter recipe is straightforward, but attention to detail is crucial. Follow these steps to ensure your recipe works correctly:
- Open the Auto Crafter Interface: Right-click on the Auto Crafter to open its interface.
- Place Items in the Crafting Grid: Arrange the items in the 3x3 grid exactly as you would on a regular crafting table for the desired recipe. Empty slots should be left blank; incorrect placement will lead to crafting failures.
- Verify the Result: Check the result slot to confirm that the correct item is displayed. If it’s incorrect or empty, double-check your item placement in the crafting grid.
- Supply Ingredients: Ensure the Auto Crafter has a sufficient supply of the required ingredients by connecting its input slots to your item storage system, such as chests, hoppers, or more advanced storage solutions like Applied Energistics 2 or Refined Storage.
- Configure Output: Set up an output system to collect the crafted items. Hoppers or other item transportation methods can be used to move the items from the output slots to your desired location.
For example, if you want to automate the crafting of wooden planks from logs, you would place a log in any one of the crafting grid slots. The result slot should then show four wooden planks. Ensure the input slots are connected to a chest or storage system containing logs, and the output slots are connected to a system that collects wooden planks. Remember, the Auto Crafter will only craft when all the required ingredients are available.
Optimizing Your Auto Crafting System
Setting up the Auto Crafter is one thing, but optimizing yourAuto Crafter recipe system for efficiency and scalability is another. Let's delve into some advanced techniques.
Ingredient Delivery Systems
Efficient ingredient delivery is key to preventing bottlenecks in your automated crafting setup. Several systems can be used, each with its own advantages:
- Hoppers: Simple and reliable, hoppers can transfer items directly into the Auto Crafter. They are ideal for basic setups but can become slow when dealing with high crafting demands.
- Item Pipes: Mods like Thermal Expansion and Ender IO offer item pipes that can transport items faster and more efficiently than hoppers. These pipes can also be configured to filter items, ensuring the correct ingredients reach the Auto Crafter.
- Applied Energistics 2 (AE2) / Refined Storage: These mods provide comprehensive storage and automation solutions. They allow you to store vast quantities of items in a compact space and use sophisticated networks to deliver ingredients to the Auto Crafter on demand. This is the most efficient solution for large-scale automation.
Output Management
Just as important as ingredient delivery is managing the output of your Auto Crafter. You don't want crafted items piling up and clogging the system.
- Smart Cables/Pipes: Similar to ingredient delivery, smart cables or pipes can be used to filter and route the crafted items to their appropriate storage locations.
- Item Sorters: Complex sorting systems can automatically distribute crafted items to various chests or processing machines.
- Void Upgrades: Some mods offer void upgrades for item pipes or storage systems. These upgrades will automatically delete excess items, preventing overflow and maintaining system efficiency.
Advanced Recipe Configurations
Beyond basic recipes, the Auto Crafter can handle more complex crafting scenarios. Here are a few tips:
- Recipe Prioritization: In systems with multiple Auto Crafters, prioritize recipes to optimize resource usage. For example, prioritize crafting basic materials like planks over more complex items.
- Conditional Crafting: Some mods allow you to set conditions for crafting. For example, you can configure the Auto Crafter to only craft a certain item when the stock of that item falls below a certain threshold.
- Recipe Cycling: Utilize multiple Auto Crafters to cycle through different recipes. This can be useful for crafting complex items that require multiple steps.
Common Pitfalls and Troubleshooting Auto Crafting Recipes
Even with careful planning, issues can arise when setting upAuto Crafter recipes. Let's look at some common problems and how to solve them.
Recipe Misconfigurations
One of the most common issues is an incorrect recipe configuration. Double-check the following:
- Item Placement: Ensure items are placed in the crafting grid exactly as required by the recipe. Even a slight deviation can cause the Auto Crafter to fail.
- Item Damage/NBT Data: Some items have NBT data, such as damage values or enchantments, that must match exactly for the recipe to work. Use tools like the Mechanical User from Thermal Expansion to handle items with specific NBT data.
- Recipe Conflicts: If multiple recipes use the same items, the Auto Crafter may craft the wrong item or fail altogether. Resolve recipe conflicts by using more specific item filters.
Ingredient Shortages
The Auto Crafter needs a consistent supply of ingredients to function correctly. If it runs out of any required item, it will stop crafting.
- Insufficient Input: Ensure your ingredient storage system has enough of each item to meet the crafting demands. Expand your storage capacity if needed.
- Slow Delivery: If the ingredients aren't being delivered to the Auto Crafter quickly enough, increase the speed of your item transportation system by using faster pipes or more efficient hoppers.
- Item Filtering Issues: Make sure your item filters are correctly configured to send the right items to the Auto Crafter. Incorrect filters can cause the wrong items to be delivered, preventing the recipe from working.
Output Blockages
If the output slots of the Auto Crafter are blocked, it will stop crafting. Clear the output path to resolve this issue.
- Full Inventory: The chests or storage systems connected to the output slots may be full. Clear out the excess items to make room for the crafted items.
- Slow Output System: If the output system is too slow, crafted items may back up and block the Auto Crafter. Upgrade to a faster item transportation system.
- Jamming: Sometimes, items can get stuck in the output path, causing the Auto Crafter to stop. Check for any jammed items and clear them manually.
Case Study: Automating Diamond Production
Let’s consider a practical example: automating the crafting of diamond blocks. To do this, you’ll need nine diamonds per block. The recipe is straightforward, but efficient automation requires a well-planned system. Here’s a step-by-step approach:
- Diamond Source: Establish a reliable source of diamonds, such as a quarry, a mob farm that drops diamonds, or a trading system with villagers.
- Storage System: Use a high-capacity storage system like Applied Energistics 2 or Refined Storage to store the mined diamonds.
- Ingredient Delivery: Connect the storage system to the Auto Crafter's input slots using item pipes or cables configured to only transfer diamonds.
- Recipe Configuration: Place nine diamonds in the Auto Crafter's crafting grid in the correct 3x3 arrangement.
- Output Management: Connect the Auto Crafter's output slots to another storage system to store the crafted diamond blocks.
By implementing these steps, you can create a fully automated diamond block production line. Regular maintenance and troubleshooting will ensure the system runs smoothly, providing a constant supply of diamond blocks for your building projects.
The Future of Auto Crafting
As Minecraft continues to evolve, so too will the capabilities of automation. Imagine future updates incorporating features like:
- Dynamic Recipes: Auto Crafters that can automatically detect and learn new recipes based on available ingredients.
- Variable Crafting Quantities: The ability to set the crafting quantity dynamically, based on demand.
- Integration with Machine Learning: Auto Crafting systems that can optimize resource usage and predict crafting needs.
The Auto Crafter is a game-changer, allowing you to focus on the more creative and challenging aspects of Minecraft. By masteringAuto Crafter recipe configuration and optimization, you can create efficient and scalable automation systems that transform your gameplay. So, dive in, experiment, and unlock the full potential of automated crafting!